Wednesday, June 29, 2011

My Finished Cork Board and Sitting Room Decor, Decor, Decor!!!

Hip-hip-hooray!  My lovely Sitting Room is feeling complete! There's a whole-lotta decor chatter in this post (hence the triple 'Decor' in the title).  Here's a look at the final product!

In my last post I showed the DIY steps for this distressed vintage styled cork board (my sister corrected me today, I called it a bulletin board in the last post, thanks Holly).  Check out how I decorated it!  I used the maps I had talked about along with a few other fun things!
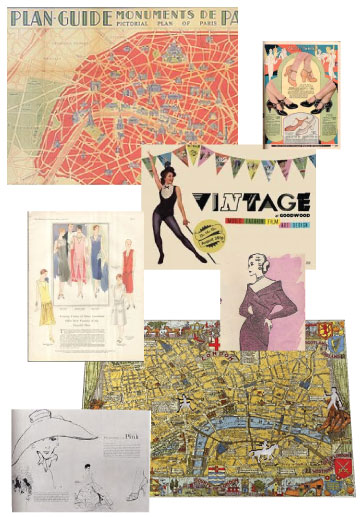
Let's have an up close look at some of them...
I had these antique fashion ads from an old newspaper that I picked up at an antique shop in Stillwater and never knew where to use them.  I think they look right at home here on the board. The goofy little cards on the bottom right side are actually little Hanna Barbara playing cards from the 1960's that we found stuck in the radiator in our Guest Room when we did tornado clean up.  They are a little crispy, but I think they were a really fun discovery.  Makes me think that room was most likely a child's room at some point in time. 
In this photo you can see more of the distressed finish on the board as well.  I added a fun photo booth picture of Alex and I that makes me smile.  I also have 2 old Vogue covers prints on the board, I think they are a fun glamorous touch!  That was a suggestion some of you gave me in the comments- thank you, great idea!
Another fun thing to note in this 'Gratuitous Rocco Photo' are the wood crates used as a side table.  I picked those up a while back on an antiquing trip in St. Paul (you can see that post here). They were a total score.....both for just $4.50 each! 
Also, do you see that grate on the right side of the photo on the wall?
Here is a closer look...
I got this grate from Bauer Brother Salvage in North Minneapolis.  I thought it was perfect for this room with it's olive green color, great match for the hanging antique window and throw blanket.  I got the idea for placing photos on an antique grate from Bachman's Spring Idea House.  I thought it was a really unique way to display photos.  Definitely check out the link to see how they did it, they had a variety of grates too, it was very cool!
A photo from our first trip to Chicago and on our wedding day on a Pedi Cab
Oh, and does this lamp look familiar?  It is the one I talked about in my Head Over Heels post a few weeks back.  It is the Barometer lamp from Ikea for $59.99.  It has such a nice vintage feel to it, and it is pretty study- I was impressed by the quality! 

I am really happy with how sweet and charming this little sitting space turned out to be!  In fact, I am currently cuddled up in my big cuddly Ektorp chair (which was a Craigslist steal for only $80) while I finish writing up this blog post.  It is a perfect little spot for blogging :)  The room really has come a long way since back in January when we pulled out the icky carpet and Alex installed wood flooring.
Before all that we NEVER used this room at all.  Now I have my Dressing Room and this lovely sitting space!
Whew!  What do you think?  I'm really loving it, although now sitting and looking over at my Dressing Room I am afraid I might need to do a few changes in there too, hmmm....
Oh dear, this Spare Room space may never be officially finished!  Darn awkward layout!  Decisions, decisions.  Does anyone else struggle to design a particular space in their house?  Or change up a room alot?  Maybe it's just me?!?

***6.30.11 Update: I realized I assembled the lamp wrong, there is an extension of the arm that is missing, I went to throw away the box this morning and found another part in it!  Oops!  Guess that is what I get for not following the stick figure Ikea instructions! I will try and get another photo of the fully assembled lamp!***  


Monday, June 27, 2011

Distressed Bulletin Board Wall Decor

How was everyone's weekend?  Ours seemed a bit busy (hence the lack of posts), but I am excited to show you what I worked on for the Spare Room!  In the last post I showed some of the accessories for the space, but was kind of stumped for ideas for the awkwardly shaped wall behind the Ektorp chair...
I went back and forth about using different sized frames for photos and arranging them in a way that made sense, but it just seemed a bit forced for the weird space.  I kept thinking that I wish I could overlap photos... then a brilliant idea popped into my head!  Why not create a large bulletin board?  Then I could overlap images and pin up any cool pictures or ideas that I am in love with. I can also change it as often as I like!  Totally perfect for this sitting room space nearby my dressing room!

I guess I also kept thinking about that bulletin board I featured in my Burlap Head Over Heels post...
To give you a better idea it might look something like this (fingers crossed!).  But of course cuter with my own photos and artwork.
(looks like a cartoon- ha!)
To get started, I ordered the largest cork board I could find at a low price.  The best deal I found was a 36" x 48" board from the Container Store for $34.99- not too bad considering this thing was pretty huge!
The board looked pretty generic, so I had to add my special touch to make it more special.  I decided to paint it white and add a distressed finish for a vintage look. Believe it or not, this is my first time doing a distressed finish DIY project!  Here we go!

I started by sanding the wood frame into order to rough up the surface for painting.
 After sanding I put on 2 coats of white paint.
Once the paint dried I carefully rough sanded the frame to give it that distressed/ chippy look.
Ooooo, ahhh... it is looking older, loving it!

I just hauled the board back up into the Spare Room for Alex to hang for me.  It came with some special screws and brackets because of it's size. I thought I would leave this for 'the man' to do- otherwise there might be a few extra holes in the wall :)

Here is what I am dreaming up for the board. 
I have some vintage styled maps that I picked up at Posh in Chicago.  I thought I would combine them with some vintage fashion prints and old sewing patterns.  I want the space to have some more color than what I normally do in our house so it feels a little more inspiring and feminine.  I'm also getting a bit more freedom to design the space the way I want since Alex won't be using it as much as me (isn't he sweet?!?).

Anyway, I will be decorating the space and getting it ready for some 'after' photos for later this week!  Yay!  So what do you think?  Do you like the vintage fashion prints?  Any other suggestions for what I should put on the board?  Be sure to let me know if you have ideas!

Friday, June 24, 2011

HOH: The Charm and Simplicity of Kitchens With Open Shelving

Happy Friday everyone!  This week's Head Over Heels spotlight is all about open shelving in kitchens!  I love the look of open shelving in a kitchen.  It has a comfortable 'lived in' sort of feel that makes a kitchen all the more home-y.
I know the whole open shelving idea isn't anything new to most people, but I have a fun little story to go along with this HOH post (after you get to oogle this gorgeous kitchen)....
A Country Farmhouse
My cousin Lou and his wife Heather emailed me earlier this week with exciting news... they are buying their first house!!!  Naturally, I was SUPER excited for them because of my obsession with homes and home makeovers.  They said the home is in need of some TLC and ran a few ideas by me since home decor and DIY-ing is our thing (thank you so much you guys, I love getting asking decor questions!).

Lou and Heather asked what my take was on open shelving in kitchens and if I could help sway them in one direction.  Obviously I am a huge fan of open shelving in kitchens!  We have some in our kitchen- which wasn't really by choice, there weren't any cabinets to begin with.  But I love the open shelving we have now!
I think one of the tricks to making the open shelves look chic is if your dishes and glasses match the color scheme of your kitchen. It will come off looking very intentional and well designed!  If you use hooks under for mugs it is super cute too!
If you are curious our dishes and glasses are from Target- I highly recommend, we have had for 2 years and none have broken, the quality is awesome & they are beautiful!

 Let's take a look at a variety of shelving ideas for Heather and Lou that I am totally Head Over Heels for!

First...
 Here are some different styles of shelving and brackets ranging from industrial, to traditional, modern and contemporary.
Coco Cozy
Restoration House
House Beautiful

Fresh Home

Count It All Joy

Next...
Here are a few examples of simply removing cabinet doors and using the existing shelving.  This one is a great cost effective DIY project and the results are gorgeous!

Our Vintage Home Love- 
PS: I love how Diana used baskets in some of her shelves, this is a great way to store items that might not match the decor of your kitchen (aka Lou's pint glasses!)

Resolve 2 Worship


Simply Brookes

One last idea...
Doing a combination of open shelving and cabinets!  This way if you are on the fence you can have it both ways!
Beautiful Kitchens
The Lettered Cottage

Our Vintage Home Love-(the other side of Diana's kitchen)

************
One final thing to note on open shelving: If your kitchen is a little on the small side, open shelving will help to open up your space and make it feel larger!  Remember that first photo at the beginning of this post?  Would you have thought it used to look like a tiny boxed in space?  Check out these amazing before and afters!
A Country Farmhouse
Totally Head Over Heels for Trina's kitchen! 

Alright Heather and Lou... Are you getting pumped for a kitchen redo? I hope you feel inspired! Did you make up your minds about open shelving?  
What does everyone else think about open shelving in the kitchen?  Are you Head Over Heels as well?  Do you have any advice for Heather and Lou about their pending kitchen redo or as new homeowners?  Send us some comments!!!!

Wednesday, June 22, 2011

Lights, Camera, Docu-WHAT?!?! Our Small Part in the History of North Minneapolis

Tuesday evening was pretty exciting at our house!  Alex and I were honored to be filmed and interviewed for a small part in a local documentary about our neighborhood titled 'Cornerstones: A History of North Minneapolis'
We have our little house blog to thank for the opportunity to be apart of this project.  Turns out the editor and publisher of the North News forwarded our blog to Dan Bergin the Producer of the documentary (thanks Margo!).  Once Dan read a little about our love for the history of the neighborhood, the history of our house/ families that lived here, and how we chose our house, he thought we would be a nice addition to the documentary.  How cool is that!?!?

Here is a picture of Alex and I with Dan after our interview.
He sent us a brief description of the content for the documentary:

‘Cornerstones: A History of North Minneapolis’ reveals surprising stories of the North Side through the power of place.  From the historic Sumner Branch Library to one of the last remaining commercial buildings from old Plymouth Avenue to the Emanuel Cohen center-now Oak Park Center, Cornerstones will explore diverse history through North Side buildings, spaces, and sites.  The one hour documentary and accompanying web site will be a touchstone for common ground, education and understanding about the community that represents the city’s past and hopes for the future.     The project is a co-production of the University of Minnesota and Twin Cities Public Television.

If you look back at my post about the Northside's history, it details some of the story about the area.  There is a ton of history here and it sure has seen a lot of ups and downs.  I imagine it will make for an amazing story for the documentary and I can't wait to learn more about my surroundings!
It was pretty fun to see lighting set up in our house and mic packs attached to us as we walked around.  Yep, little things like that are exciting to me :)

I think we did our best to tell the story of the families that lived in our home (all the way back to 1924) and how we feel about our community.  We also touched a bit on all the work we have done to our home and how we strive to keep it's historic character and quality. 
Even though it was fun it was still a bit nerve wracking.  I hope we do our neighbor's proud (and don't sound like a couple dorks)! We look kind of dorky in that picture, haha!

  I have to say it makes me feel very proud that we are looked at as a small bit of history in our community.  When we started this little blog, it was just to show our room redo's, DIY projects, and my love for home decor (which I also have to thank our old house for- my passion for home design certainly increased after we moved here).  Who would have thought we would get a cool opportunity like this?

I will post an update when we get any news about it's premier date or when the website is up and running!

Anyone else out there have fun opportunities come their way because of your blog? Or, maybe you've learned more about the history of your home or neighborhood?  I'd love to hear other cool stories!

*** UPDATE ***

Here's the link to the Cornerstone's website
Sadly, we didn't make the final cut of the documentary, wa-wa.  But, we are included in the online extras!  Here's the link to our video, enjoy!
http://www.uroc.umn.edu/cornerstones/cornerstones_extras.html#top
(Alex is waaaaay better on camera than me!)

Monday, June 20, 2011

Before Construction Begins: Lead and Asbestos Testing

You all know Alex and I love old homes.  One big downside though, anything built before 1978 gets tricky when it comes to construction or renovations.  Case in point, before we can get started on repairs from the tornado damage our house needed to be tested for lead and asbestos.... yay (sarcasm font).

The contractor we are working with and I hope we get to continue working with, (still waiting on you American Family Insurance for recovery funds) put us in contact with Indigo Environmental to get our house tested for lead and asbestos in the areas of our home that are in need of repairs. 
But first, lets cover some facts from the EPA about Lead and Asbestos

Lead is a toxic metal that was used for many years in products found in and around our homes. Lead is commonly found in older homes, it was banned by the EPA in 1978Lead paint used lead acetate as a drying agent and gloss improver. It was considered a better type of paint and was more expensive, that is until they discovered it is harmful and poisonous to humans.  It becomes a health risk when surfaces covered in lead paint begin to peel, chip, crack, or are dry sanded.  It is more dangerous to children because they are growing and their bodies can absorb more lead.  Children's brains and nervous systems are more sensitive to the damaging effects of lead leading to behavioral and learning problems, slowed growth, hearing problems and headaches.  For adults (aka Alex and I) the risks are reproductive problems, high blood pressure and hypertension, nerve disorders, memory and concentration problems, and muscle/ joint pain.   

Asbestos is a mineral fiber that has been used commonly in a variety of building construction materials for insulation and as a fire-retardant. Because of its fiber strength and heat resistant properties, asbestos has been used for a wide range of manufactured goods, mostly in building materials (roofing shingles, ceiling and floor tiles, paper products, and asbestos cement products). When asbestos-containing materials are damaged or disturbed by repair, remodeling or demolition activities, microscopic fibers become airborne and can be inhaled into the lungs, where they can cause significant health problems.  Health risks include lung cancer, mesothelioma, and asebestosis, in which the lungs become scarred with fibrous tissue.

Gee, I feel really great, healthy and safe now (more sarcasm font). For more facts on lead, asbestos, and other toxins that can effect your home check the EPA website. It is very informative (and scary).
So what is the testing like?  To me it sort of looked like a mini CSI investigation.  The representative from Indigo Environmental came by and took small samples from each surface that will be disturbed in the repair process.  For the hole in our Guest Room, he took a few pieces of the plaster and put them in a small labeled baggie.
Also, I learned a really interesting fact from him about our insulation (which I still don't know if I wanted to know).  That layer that looks a bit like recycled cardboard is in fact made partly from cow manure- yep poo!  I stood there with a look of horror on my face, but he then informed me that this was pretty normal for 1920's homes.  It provides a great layer of insulation and is a good sound barrier, it is likely that the poo is used as insulation between our walls as well.

The rest of the testing looked kind of like this...
The other surfaces in need of repair are full of moisture so they will be removed.  Since it has no other damage (like a big ol' hole) he had to scrape the surfaces and carve out a small hole to get a sample.  There are a bunch of these in our house now :(  at least sometime soon it will all be fixed.... cough, insurance, cough.

Once he was all done there were a bunch of these little baggies with the samples and labels.  Just like CSI right?
A few days later we got the results back.  Thankfully no asbestos, yay!  Asbestos sounds like really scary stuff.  There is however some lead paint, which I expected since it is so common.  Luckily there isn't a lot.  Lead paint only showed up in the crown molding of our guest room and on the old wood trim (which was covered by new soffit) on the outside of our house.  

The fancy-shmancy report looks like this...  
I circled the sections were the lead concentration was high enough for a health concern.

So that big step is done now.  We hope we get to meet again with our adjuster and contractor to land on an amount for repairs.  I just want the work to get started, it has been a month now and I am sick to death of hearing wind whistle through the hole in our house!  Crazy to think that I am praying for our house to be a messy construction zone soon- but I can't wait!

Has anyone else had lead or asbestos testing done on their home?  What did you think of the process and did you find any weird facts about your home?

The Lettered Cottage


Sunday, June 19, 2011

Happy Father's Day...

To my wonderful Dad.
 I hope you are proud of the woman your little 'Peanut' grew up to be.  I don't know where I would be without all of the years of 'dad' advice- I'm thankful you are always there for me when I need you.  Sometimes every little girl still needs her daddy. 
To my Stepdad John.
I'm so thankful you became part of my life and have always treated me like I was your own daughter. I can't even begin to describe how lucky I am to have a stepdad like you.  You also shaped a big part of my life and I always hope you are proud of me.  
To my Father-In-Law
Thank you for being an amazing father that helped shape Alex into the wonderful man that became my husband.  I know Alex gets a lot of his sense of humor from you, and I feel blessed that I get to spend my days laughing with him (and sometimes at him).  I also couldn't ask for a nicer father-in-law, so thankful for our growing relationship.
 To our three dads on Father's Day, we love you very much!

Lastly, Happy Father's Day to all the dads out there!  It sure doesn't look like an easy job, especially for fathers with daughters to look after :)  I hope everyone is having a lovely Sunday with friends and family they love!

Friday, June 17, 2011

Head Over Heels: Lonny Magazine

Get ready for some beautiful images ahead!  My new Head Over Heels find this week is a bi-monthly online magazine that focuses on lifestyle and home decor called Lonny.  Lonny highlights extraordinary interiors, innovative bloggers, and the latest market finds. 

I was even more intrigued with this online magazine when I learned about how it got started in 2009.  Founder Michelle Adams was a market assistant for Domino until 2009 when Domino was closed by Conde Nast for good.  Instead of looking for another magazine to work for, she and photographer Patrick Cline launched Lonny in 2009. How DIY is that?!?!  I know I feel inspired by that, love it!  Then, with so many other decor magazine closing- Lonny immediately caught the eye of readers and advertisers finding it's niche.
Lonny looks like a print magazine, not a Web site or a blog. It has pages to turn, a table of contents and full-page ads. But it offers Web-only benefits like zoomable, clickable images, so readers can inspect... say the mirrors and shower curtain shown in this bathroom below, then click and buy online.
Here is a link to their most current issue.  I know I spent a shameful amount of time just cruising through all the beautiful images.  Lonny seems to have something for every style so they reach a broad audience. They're a little vintage, modern, contemporary, elegant, casual- everything! 

I just love when I find a new place to get inspired when it comes to home decor, totally Head Over Heels for Lonny this week.  Special thanks to Amy for mentioning this awesome online find! 

Here a few of my favorite images from the 'Decorate' page 

Which ones were your favorites?  Have you seen Lonny before?  Do you love it too? Oh, did you see they have a 'Submit' page?  They love featuring new designers and DIY-ers, I think that is awesome!
Lastly- who wants to start an online magazine?  (my hand is up) Hehe!

Thanks for joining me for this week's Head Over Heels post!