Friday, May 31, 2013

Head Over Heels DIY Friday: Gold Zip Trim Scarf

Remember a few weeks ago when I shared my tutorial for the Zipper-Cape?  Near the end I mentioned that I had some navy blue fabric that I wanted to use for another scarf so.... I did, but this version is BIGGER & BETTER and I am going to tell you how to make one too!

Take a look at my versatile creation- the Gold-Zip Trim Scarf!
 To make your own, here is all you need:
- 49.0" Width x 61.0" Length piece of fabric (finished size is 24.0" W x 60.0" L).
* Note- you can use two separate pieces of fabric in 25.0" W x 61.0" L sewn together also
- 24.0" long separating zipper
- Basics: sewing thread, pins, sewing needle or machine, scissors

Start with fabric folded wrong-side out and pin edges together.  Then, sew the 60.0" length and one of the 24.0" sides.  Be sure to leave one of the 24.0" sides unsewn.

Pull the fabric right-side out through the open end, pin edges, and sew the last 24.0" side together.
 The step is adding the separating zipper in.  Start by unzipping and separating each side and pin in place. 

Ready?  Here's the tricky part...
You will add one side of the zipper 4.0" from the 24.0" end.  The other part of the zipper will go on the reverse side of the scarf along the length 4.0" from the top edge.  Then stitch both in place.

Not too tough right?  Now start playing!  Zip, loop, twist, drape, wrap, and whatever else as you figure out your favorite ways to wear it.  Here are some of my favorites!

You probably already know this, but I am a sucker for anything that you can wear multiple ways or has added functionality, so I'm definitely Head Over Heels for this DIY! 
Are you too? 
What do you think of the Gold Zip Trim Scarf?

Here are the links to my other Multi-Wear Scarves if you are up for some more sewing!

Make sure to let me know if you try making one too!  Have a great weekend!

Tuesday, May 28, 2013

Memorial Day Mini Project- DIY Raised Garden Beds!


Hey Everybody, Alex Here...The Holiday weekend is over and we managed to get a lot of little things taken care of around the house. Yesterday, Carla had her hands full with some front yard/curb appeal projects and I got my hands dirty in the backyard with the simple but fun project below. I hope you enjoy and maybe even try making some of your own.

These elevated garden boxes were ridiculously easy to build and install and the new “Cedar Toned” Pressure Treated lumber that I picked up at Home Depot made for a very classy look (at a fraction of the standard Cedar price) for our back yard.

Here’s a list of materials that you’ll need to make three of your own garden boxes measuring 8' length x 2' width x 1' height.

15 – Pressure Treated (Cedar Tone) 1x6x8’s
3 – Pressure Treated (Cedar Tone) 4x4x8’s
1 – 1lb box of #9x3” deck screws
1 – 4x50 roll of weed stop sheeting
??? – Dirt/Plants/Seeds of your choice!

To start with, my design would use five of the 1'x6'x8' boards for each box. Four of these would remain the full 8' length and the fifth gets cut into four equal 2' lengths. I then cut one of the 4x4x8’s into 5 chunks that were each 18” in length (only 4 are used per box so you will have some scrap lumber unless you decide to cut them all at 24”).

Next, I assembled what would become the box ends by screwing two of the 1'x6'x2' pieces level to the tops of two of the 4"x"4x18" “legs”.

The final construction step was simply connecting the two ends using four of the 1x6x8’ boards. To accomplish this, I spaced the ends apart and squared the 1'x6' boards in place and attached with the decking screws. Repeat this step for the remaining “long side” and then you’re ready to place in your desired location. So Easy!!

We chose to place the completed boxes along the southern fence border of our yard. This area should get plentiful sunshine and was in desperate need of a little pick me up anyway. Once our location was decided on, I cleared some existing vegetation and did a little work to level the ground before “dry fitting” the garden box in place. After the test placement, I grabbed my post hole diggers and dug out 4 holes for the 4"x4" legs to fit into. These are really just to stabilize the box and prevent it from shifting (If you’re in the mood for something more permanent you could always use longer legs and then cement them in place).

Before dropping the legs into place and filling with dirt, I dropped down a good double layer of the weed block fabric to prevent any unwanted plant life from sprouting up.

Now, simply add dirt and the fruit/veggies/flowers of your choice! We had quite a bit of fun planting our first garden together for this project and it is a great addition to our backyard! The relatively low cost of completion and seriously short amount of time required to build will be fresh in our minds later this summer when we have some great homegrown fruits and vegetables on the table!

What do you think of our DIY planter/ garden boxes?
What are some good tips/tricks for growing your own fruits and veggies? 

It's our first attempt at growing our own and I hope they turn out.  If you have any tips please let us know! 

Friday, May 24, 2013

Head Over Heels DIY Friday: Summer Style Kick-Off for Memorial Day Weekend!

Let's be honest, when it comes to Memorial Day weekend who can think about any kind of project when it's the official kick off of Summer?!?  I know I can't right now, all I can picture is BBQ or picnic food, ice cold cocktails, and diving head first into warm weather fashion (finally!).  So this week I wanted to share my style inspiration and party ideas for Memorial Day weekend- let's take a look!
Blackberry & Watermelon Crush Cocktail Recipe: Stagetecture   |  Hot Dog Bar: Bon Appetite  |  Strawberry Shortcake Dessert in Jars: Dole  |Awning Stripe Outdoor Pillows: Pottery Barn  |  Stripe Wedge Sandal: Zara  |  Anchor Charm Necklace & Chain Cuff: Forever 21  |  Pleated Cherry Red Shorts: Forever 21  |  Two-piece Stripe Swimwear: Target Xhilaration Brand  |  Outdoor Cafe String Lights: Pottery Barn

Anything striking you too?  I'm dying to get those stripe wedges and the pleated red shorts, how cute would that look with a white tank on top?  I'm loving it all really though I guess, but right now I really want a hot dog now, LOL!  Head Over Heels for hot dogs, ha!
Alright, I'm otta here!  It's time to unplug for this three day weekend so Alex and I can (try) to relax and enjoy!  Woo-hoo, it's summertime ya'll!!!!  

What will you be up to this weekend?
What summer fashion favorites are you excited to pull out from storage or purchase?

Hope you have a gorgeous weekend with family, friends, food and fun!  Cheers!

Thursday, May 23, 2013

A Completed Closet Along with a Comic

For now at least :)  I guess what I've learned from taking on this project is that I'll likely keep messing with the space because it's strangely kind of fun.  Anyone else have a room they tinker with a lot too?  Maybe it's because I'm the only one using the room and can do whatever, or I just enjoy reorganizing it all as my storage needs change?  Who knows but the important part is that I've got all new 'after' photos to share with you today!

In case you aren't familiar with earlier posts, this weird/long room is located off of our Master Bedroom and only accessible through it using this door between the once "his & hers" closets (which are now Alex's "his & his" since I took over the new space)...

When we first moved into the house we weren't quite sure what to do with it but knew that the icky carpet had to go!

It stayed empty for another year and then after seeing some glamorous "dressing room" photos, I was inspired to create my own!

Not to mention that I could no longer stuff everything into an itty-bitty closet, oh the horror!
(Shudder) 

With that, let's take a look at my new (DIY) Closet photos!

Here are the details that brought it all together!
In the spirit of hanging my money where I can see it a-la Carrie Bradshaw, I bought two commercial garment racks from Target for $49.99 (spray painted Oil Rubbed Bronze)
But my proudest DIY creation on this project was definitely my "curtain rod" shoe and scarf storage idea using Racka Rods and Wall Brackets from Ikea which totalled a mere $33.00!  I said it before and I'll say it again- Every gal needs a place to hang her hat heels right?! 
Yep, that has to be my 2nd favorite to Hammers and High Fives in my blog realm of strangely delightful and/or cheesy catch phrases- Which then leads my imagination toward my own comic book or action flick...

--- Temporary sidetracking warning ---
... co-starring the Rock or is it Dwayne something now, you know that one big guy that's in lots of action movies?  Yes, he could hang out in my closet to keep everything in it's place, then polish jewelry and shoes all day while I am at work.  Hmmm, that'd be lovely...
However now that I'm thinking about it, if given the choice I'd prefer Andy Cohen to have that gig.  Then I would come home to Real Housewives gossip and "Drinking Game Alerts!" Ahhhh!  Yep, this is what goes on in my head sometimes, could be worse though right?
--- And back to business/ reality --- 
For jewelry storage, I decided to turn it into wall art using a $9.99 cork bulletin board from Menard's.  I also pinned on some fun photos that make me smile every morning.
Isn't the close up of Rocco's little fuzzy face adorable?!?!

You might have also noticed that I changed up my DIY Greek Key window shades a little.  I decided to ditch the violet color and go with classic black instead.  I also found that using 3M Friction tape is way better than the vinyl! 
Each roller shade was $14.25 from Home Depot (they cut to exact length you need) and the Friction Tape was about $5.00.  The Friction Tape was more like fabric so in the end it did look much better, especially against sunlight! 

***UPDATE- I also have to call out that even with the shades, that I added black-out window film on the two windows that sit behind my garment racks.  I didn't take photos of it but I can later and add in, but I did this to further protect my clothes from the sunlight.  I opened the windows during the time I took these photos to make the room look nicer and let light in, but normally I don't get any light through those two windows.  I know it sounds weird, but with so many windows in that space it's the best way to protect my stuff!***

The vintage/thrifty finds that helped give it a personalized touch were the campaign dresser $10.00, antique armchair $2.00 (followed by a DIY facelift), oversized "Z", and the set of gold wall sconces for $2.00.


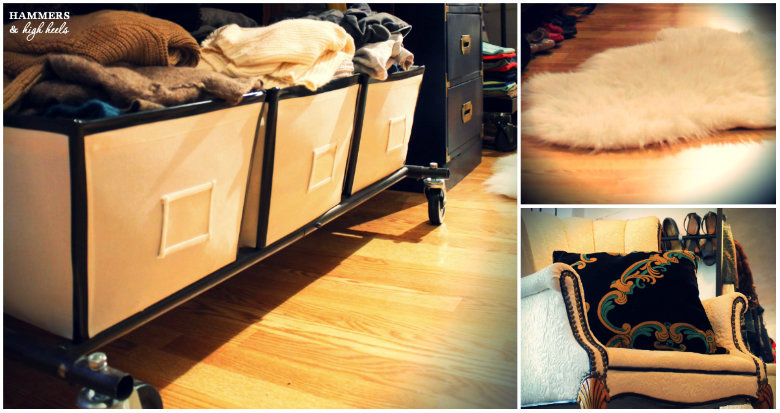
The decorative pillow, sheepskin rug, and canvas storage baskets were all things we had in our guest or soon-to-be office.
The bright side is that I didn't spend more money, but I also never fell in love with anything enough to purchase for the closet like I had hoped.  At least for now they seem to fit nicely and maybe I'll find replacements when I am not looking (I hope)!

So, maybe someday I will have the Lisa Vanderpump closet of my dreams, but for now opting to turn a small room into a large closet seems to be a fantastic solution!  Do you agree?

What do you think of my DIY Closet set up?
Would you do the same if you had extra rooms and only small closets available in bedrooms?
What other storage ideas do you think I should add or could add over time?
Lastly (and it's the most important one to answer), did you like my Hammers and High Heels Comic?

* Updated on 5.28.2013- noted black-out film on windows that sit behind my garment racks, protects clothing so the sun cannot fade them.

Sunday, May 19, 2013

Looks like We Forgot to...

Clean the gutters...  Last fall and perhaps earlier this spring.  Whoopsie!!!

It had been raining for a couple hours today here in Minneapolis and it didn't take us long to notice water spewing over our gutters.  With a flash flood watch today and rain in all of the extended forecast...

Alex decided he had better hop on a ladder and clear the way so water could travel out of the downspouts and away from our home's foundation.  At least he looked pretty cheery doing it right (or it was because he had just downed a Venti Starbucks and was amped on caffeine)?

I guess we're getting those April showers now just in time for June flowers?  At least our gutters are now ready for the spring/summer rain and storms!  Guess it reminds us to always be ready for severe weather during this time of year- outside and inside our home. 

Hope everyone else in this same band of rain and severe storms across the Midwest is staying dry and safe! 

Friday, May 17, 2013

Head Over Heels DIY Friday: Summer Styled Rope Mirrors and Candle Holders

Hello and happy Friday!  I have a sort of Summer DIY decor post for you today, because honestly I'm confused about whether we are in spring or summer right now.  It feels like we just skipped over spring and went right into summer here in Minnesota, does it feel like that where you are?  I know Memorial Day is next week which is the official start to summer, but heck it was freezing a week or two ago so let's just call it summer I say! 

Now onto my summer styled DIY project- Rope Mirrors and Candle Holders!
I've been seeing a lot of home decor made with rope lately and figured I could add it to some mirrors or candle holders at home.  So, I grabbed some Sisal rope from Home Depot for just $8.81 to add onto three glass candle holders and two mirrors I had at home.

For the candle holders, all I did was wrap the sisal rope around a few times and then pinning the ends to hold them on (no glue required on these!).

The mirrors were a little trickier and required the use of a hot glue gun.  I cut enough rope to go around my square Ikea mirrors three times with a bit extra to loop at the top.  I glued the rope in place around the edge of the mirror (shown in images below).
For my round mirror it was a bit easier.  I just placed cut rope on the inner edge of my mirror and glued the ends together.

Easy-peasy right?!?!?

I'm Head Over Heels for this simple DIY's, are you?!?!

I'm loving this fresh summer-y update for the mirrors & lanterns, but right now they are on my mantel and I feel like we are lacking some color.  So, help a girl out!  Tell me...

What could I add to the mantel or fireplace itself that would add color and compliment the rope/summer theme?

Wednesday, May 15, 2013

Home Depot Gift Card Winner and the Best Kept Secret at a Twins Game

Thank you to everyone that posted a comment on our 3rd blog-o-versary post!  But before I get to the giveaway winner I have to tell you that I loved reading the comments as they rolled in!  Some comments were really sweet and it was helpful to get feedback on what kind of posts you enjoy most or how you found us in the first place.  It was fun that a couple of you mentioned the room redo we got from Kevin & Layla of The Lettered Cottage and have been reading along since (mostly because before that my mom and sister were our only readers!).  But we also loved to hear that some of you have a similar style/older house or that you live nearby (neighboring states count too!).

So thank you again to everyone that commented, but it's time to find out who won the Home Depot gift card giveaway?!?!?  Drumroll... and the winner is....

Congrats Susie! the winning random number was 4 and your comment was the lucky 4th posted! Please send me an email with your mailing information and we will get that Home Depot gift card sent out!
Random winning number selected by Random.org Sequence Generator

Now onto a different topic (which is very different than any of our posts ever before) the Minnesota Twins!  I have to tell ya that we are majorly distracted this week because we went to a Twins game Monday and I went to another at noon today! 
Woo-hoo!  Nothing makes spring/summer feel more fun that a good-ol baseball game out in the sunshine!  But I think I might have learned the best kept secret at Target Field thanks to my neighbor Chris on Monday! 

Did you know there is an actual organ player on the 4th level inside the 2 Gingers Bar?!?! 
I had no idea either!!!!  I just thought that all those old fashioned baseball songs were just a recording that came on when someone pressed a button, but no!  All the tunes are played by organist Sue Nelson, she's the real deal and it is quite fun to watch her in action!  Alex caught me in action after we found her, I'm bopping around like an idiot but I was having a blast in the moment :)

Well, now I must admit I'm kind of tired and sunburned so I'll call that's a wrap for today!

Any other local folks go to the Twins games this week?
Did you know that there was a real organ player at the stadium or did you think it was a recording too?

Sunday, May 12, 2013

Thank You Mom

Happy Mother's Day to all the moms out there!  Sadly, I won't get to celebrate today with my mom since she is in Michigan so I thought I'd do a long distance celebration here on the blog in honor of my mom Nancy. There are so many reasons I am thankful for having her as my mom- so many things she did, gave me, taught me, showed me, and all of it is a part of why I am who I am today.   It would be hard to cover it all in a blog post so I will stick to a few highlights that tie back to some old photos I got my hands on during our last trip to Michigan (which will also be very entertaining for you)!  So...

Mom, in honor of you on Mother's Day I want to say thank you for everything but especially these highlights from my life!  Hope you enjoy these memories and stories, I miss you very much today!

First, thank you for all the years of orthodontic work on my teeth- and I mean YEARS.  I know you could have bought a Lexus or something for all the retainers, spacers, braces, headgear, and whatever else I endured to straighten out my teeth.
Money well spent, thankfully I no longer look like a human jack-o-lantern and I must say I love my smile!

Next, thank you for getting me a car on my 16th birthday.  I know I was kind of a brat about this back then since it was a Geo Metro and my friends called it a "clown car", but man I was lucky to get a car!  I'll also never forget learning how to drive a stick shift in that Geo, that had to be a hoot for our neighbors!

Note- related to the orthodontics topic, this was my 16th birthday and I had braces still. They came off my Junior year of high school... yep, wasn't kidding, nine YEARS of orthodontics!

Now to my smile-sparkle-shine years filled with french braids, frozen smiles, injuries, and sheer teenage girl madness.  Mom, thank you for enduring six years of competitive cheer.  I can't imagine how many competitions you went to over that time, or how many times you drove all around the state of Michigan to watch me execute the same routines over and over. 
I know that last year was especially tough in our quest for world domination winning the state finals.  Thank you for supporting me through it all, some of it was silly indeed but it certainly taught me to be disciplined, to never quit, work well with a team, and commit to my goals.

Lastly, thank you for letting me wear whatever I wanted which included high heels at the age of 4.  I can't imagine life without high heels!  Maybe it all started back in 1988 in this moment?  Aside from the heels, you really let me create my own style even as a teenager... which I am sure had to be scary at times.  I'm thankful for my unique style and continue to see fashion as fun!

Mom, thank you for letting me be me and for giving me all those experiences that made me who I am today.  I'm proud of the woman I've become and even though I'm not a kid anymore I hope you'll always be proud of your little high-heel wearing daughter.
And again, thank you for fixing my teeth!  My jack-o-lantern photo is somewhat embarrassing but mostly hilarious looking at it now :)  I hope everyone gets a kick out it too!

Happy Mother's Day to all moms out there, hope you feel special and loved today! 

Friday, May 10, 2013

Head Over Heels DIY Friday: A Coordinating Navy Blue Cabinet for the Closet

It is a GORGEOUS Friday here in Minneapolis, makes me excited to kickoff the weekend!  This week's DIY is a pretty simple furniture redo that I just had to do because of how much I loved my updated navy blue campaign dresser.  It totally needed a buddy right? 

The only bummer about this DIY is that I missed a MAJOR step- yes, I forgot to take a "before" photo.  I know, I know, how the heck could I miss that?!?!  I am wondering that too, but the cabinet was just white before with silver hardware so I found a similar looking cabinet online to give you an idea.  It was a cabinet that the previous homeowner had in our upper level bathroom.  We didn't need it in the space so it was just stored in our basement... Until now!
I removed the hardware and used the same Rust-o-leum glossy navy blue paint that I used on the dresser.  For the hardware, I actually had some old knobs that had a unique look so I just painted them gold to match the dresser.  I figured they would work fine since I couldn't get or fit the same hardware that was on the campaign dresser.
I cleaned it off, added the hardware, and brought it up to my closet roomHere's how it's looking! 
I think just that little bit of extra storage was the missing puzzle piece for my Closet-Room redo (I still need to take all the 'after' photos though, stay tuned!). 

I know I am Head Over Heels for this DIY, especially because it was free and I put some clutter from our basement to good use!

What do you think?  Are you Head Over Heels for the revamped look?
Hope you will be back to see the full Closet-Room "afters"!

Before I go, in case you missed our 3rd Blog-a-versary post be sure to check it out and leave us a comment to win a $25 Home Depot gift card!  For those that already left us comments, thank you so much!  They have been really fun to read and make me so happy for keeping up with the blog :)  We will announce the winner on Wednesday, May 15th.